


What a cake! I cannot take credit for creating this wonderful idea, we owe it all to the award winning teen blogger Elissa Bernstein from her blog “17 and Baking”. I will give you the link to her site for assembly instructions and to the recipe below. Once I saw it, I knew I had to make it!
You can tell by the photos that it was a success, but I did have few obstacles along the way.
The recipe is lightly lemon flavored and very delicious. The cream cheese frosting is heavenly and it comes together with great looks and taste. I would definitely not attempt this with a box mix, they tend to be very soft and you need it to be workable.
Okay, I am going to be brutally honest with you. The first time I attempted this, it bombed, and bombed in the worst way. It didn't bomb in taste, which was actually delicious despite it all. The recipe can't be blamed, and neither can the assembly instructions. So, what happened? It was flat. Flat as a pancake. In fact, I have made pancakes higher than these cakes. It was also a bit rubbery, and maybe we could have had some fun bouncing it around the kitchen.
Luckily, I made the first one as a test to see what I needed to do to make it right. Since we moved here, cakes just don't do what they are supposed to in my oven. Something just isn't right.
I know, I know, some of you might think it is this or that, that there isn’t enough air so I need to mix more, or that I over-mixed, or that the chemistry is wrong, eggs too cold, flour old, did I use cake flour (yes, brand new boxes from different stores) or flour not sealed and got too much moisture, or that I should turn my head to the right 3 times and bark like a dog (just making sure you are paying attention),…but believe me over the years I have tried it ALL.
This first attempt was flat, rubbery and dense. This cake has a heavy texture anyway, which is actually what I wanted, because it is perfect for assembling this cake.However, I didn't want it it to be at the degree of being so massively dense, that it might create a black hole or a cosmic rift. The flat rubbery cake was far from perfect, but yet tasted great. So for this first trial, I just assembled the 3 flat layers and made a striped cake, and believe it or not my kids loved it, though their jaws were probably tired after all that chewing
Now, I was more determined than ever. I had to get this cake higher so I could cut them in half and make that darn flag if it killed me! I looked up more ideas online and here is what I tried differently. You may want to consider some, if not all, of these.
- I added 2 extra egg whites
- I cranked up my oven 25 more degrees
- I used 1/4 teaspoon of baking soda, taking away 1/4 t of baking powder. (This has to do with the chemistry and acid ratio)
- I beat the heck out of the butter, sugar and zest mixture, adding 2 more minutes to a total of 5.
- I whisked in some air into the dry ingredients for good measure.
- I didn’t beat in the food coloring with the mixer, I used a whisk.
Success! It worked great the second time around, though, it was still not quite as high as I hoped, but it turned out fine and did the job of impressing my family and friends on the 4th.
In the recipe link below, it originally made 2 layers, and then they adjusted the ingredients to make 3 layers. Next time, I might just double the original recipe and try that.
When you are cutting the layers and leveling this cake, remember the texture of this cake is kind of different, don’t be alarmed if it looks strange after cutting and leveling. Remember, unless you are Betty Crocker herself, this will not look perfect at this stage. But the good news is, the frosting will hide all flaws. Yes!
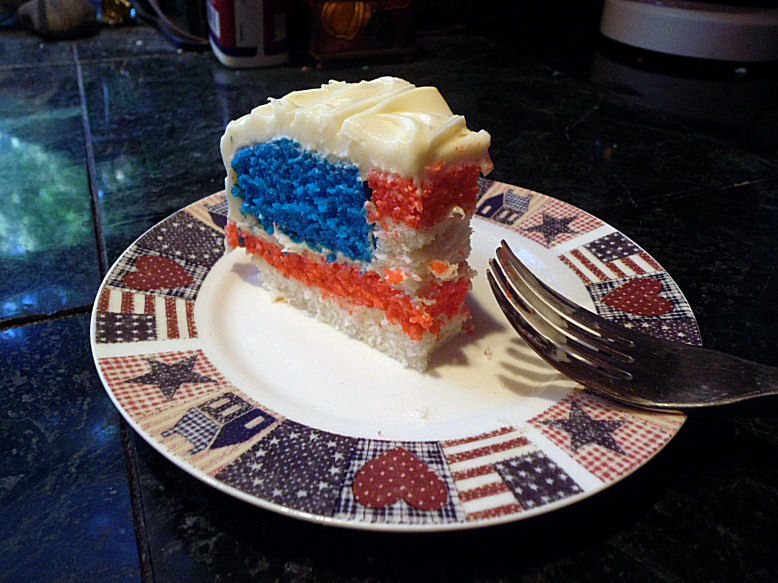
Cutting through the layers works best with a cake leveler, and you can buy one at many department stores if you like, or you can use fishing line or dental floss. For the circle in the middle, I used a bowl as a guide ensuring the inner circle would be bigger than the outer ring, you want that outer ring to be more narrow, and the inner ring to be wider. The assembly is easy once you begin, I promise!
There were lots of “oooohs and ahhhhs” and that was even before the fireworks display! It was an impressive and rewarding surprise.
Here are the links I promised for the cake recipe and the most important assembly instructions:
Elissa Bernstein’s Blog “17 and Baking”:
Link to both the cake (recipe from “My Home to Yours”) and cream cheese frosting (Recipe from “The Joy of Cooking”
Check out my photo slideshow to see my own fun experience!